Using VDMX as a Step Sequencer and LFO for Euroracks

One of the most fun aspect of using Eurorack setups is the ability to quickly reroute control data and sound between different modules. Conversely one of the most limiting parts of using Eurorack setups is the ability to quickly swap out different modules from your rack to get different kinds of control data and sound coming and going from your system. In this tutorial we will look at how the Step Sequencer and LFO plugins in VDMX can be used alongside Eurorack setups to provide a versatile approach to generating CV values.

As Eurorack modules are also often a significant investment of money, it can also sometimes be useful to use software tools like VDMX to simulate their abilities to determine if they are a good fit for your needs before purchasing.

Overivew

This tutorial is broken into three main parts:

  1. Setting up our Eurorack to convert MIDI to CV.

  2. Setting up VDMX to send MIDI to the Eurorack.

  3. Configuring step sequencer and LFOs in VDMX to control parameters on our Eurorack.


Setting Up A Eurorack To Receive MIDI to CV

Univer Iter MIDI to CV and Tiptop Audio Buchla 258t Eurorack modules.

For this initial demonstration of doing MIDI to CV we are using the Noise Engineering Univer Inter along with a Buchla & Tiptop Audio 258t Dual Oscillator module to generate tones.

The Univer Iter has 8 CV out ports along with a USB port which can be directly connected to a computer for receiving incoming MIDI. Within applications like AudioMIDI Setup and VDMX it appears as a standard MIDI output device option. It also can be configured to use a custom MIDI mapping as needed and can be daisy chained with a second module for another 8x outputs.

A variety of different modules are available for taking MIDI data in one form or another and converting it to CV. As always with Eurorack setups it is prudent to spend some time looking at all of the module options and picking the best for your specific needs.


Setting Up VDMX To Send MIDI Output

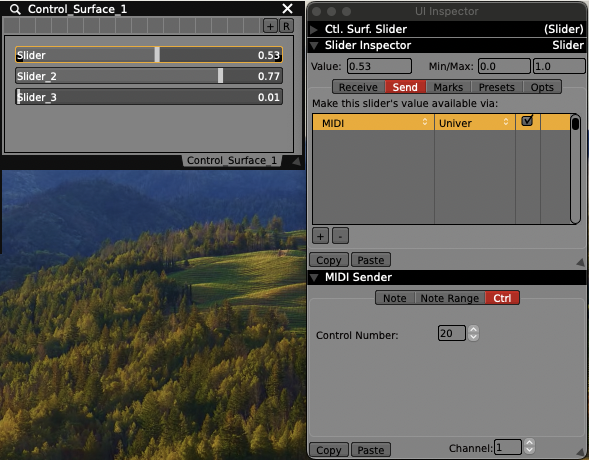
Most user interface controls in VDMX such as sliders and buttons can be configured to directly send their current value as MIDI output using the “Send” tab of the “UI Inspector” window. When configuring VDMX to drive external devices such as a Eurorack it is often useful to add a “Control Surface” plugin with customized set of UI elements that represent each of our individual CV outputs.

Steps:

  1. Use the “Plugins” tab of the “Workspace Inspector” to add a “Control Surface“ plugin to the project.

  2. Use the sub-inspector to add one or more UI elements (sliders, buttons, pop-up menus, etc). to the control surface interface.

  3. Click on each UI element in the Control Surface main window to inspect it. Use the “Send“ tab of the “UI Inspector” to configure the MIDI mapping and output device.


Configuring Step Sequencer and LFOs in VDMX To Control Eurorack Parameters

Now that our Eurorack is receiving MIDI from VDMX and converting it to CV we can begin to set up our Step Sequencer and LFO plugins to drive individual parameters of our synthesizer.

A VDMX setup with a two track step sequencer, an LFO, a clock plugin, and a control surface configured to send MIDI output.

Steps:

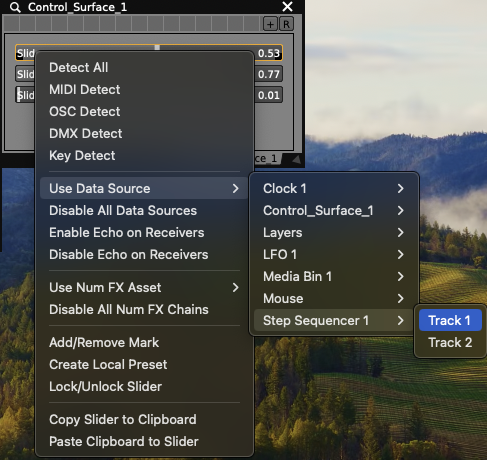
Right-click on sliders and buttons to assign data sources.

  1. Use the “Plugins” tab of the “Workspace Inspector” to add a “Step Sequencer“ plugin and an “LFO” plugin to the project.

  2. Use the sub-inspector to customize Step Sequencer / LFO configurations as needed.

  3. Right click on output UI elements in the Control Surface or use the UI Inspector to route generated control data to our MIDI outputs.

  4. Patch the MIDI module CV output to synthesizer input parameters.

  5. Use the “Clock” plugin to adjust the overall BPM.

Once we’ve created our parameter routings on the Eurorack we can also optionally further customize our Control Surface with appropriate labels and display ranges, or continue to leave them as generic 0-1 values that are commonly re-patched on the fly.


Selecting the Ideal MIDI Controller for Visual Performances

If you find yourself asking, "Which MIDI controller suits me best?" or if you're in search of a new addition to your existing controller lineup, you're in the right place. In this article, we'll explore various MIDI controller options, weigh their pros and cons, and provide insights to help you make an informed decision on the perfect MIDI controller for your visual performances.

Read More

Gesture Recording With the Data Looper

The Data Looper plugin in VDMX lets you create tracks that record data (values) from a data source, and then loop that data back, publishing it to the track's data source. Recording and playback is always quantized to the chosen clock, and the plugin also has a built-in editor that allows for quick and extensive modification of the recorded data, including scaling, warping, translation, and deletion.

In this tutorial we'll be looking at how to use the Data Looper to record incoming MIDI data and loop it quantized to the VDMX clock. 

Read More

4 Layer Korg nanoKONTROL2 template

One of the popular controllers used by VJs is the Korg nanoKONTROL, a versatile set of sliders, knobs and buttons that can be easily mapped to different setups. The goal of this more setup is to provide a good standard VJ rig for this controller that includes 4 layers with playback / mixing / color adjustment, clip / page switching along with a set of both manual and audio reactive FX that can be individually enabled.

Read More

Manually Setting a MIDI, OSC or DMX Address for a Slider or Button

While the Hardware Learn Mode and detect methods are often the fastest way for a VJ to connect sliders, buttons and other elements from a physical controller to their corresponding UI items in VDMX, sometimes it can always be useful to manually enter in these addresses. You may need to do this if some item on the controller sends multiple MIDI values at the same time, or when attempting to set up a project working from a spec sheet when the device isn't actually plugged in.

Read More

How to make a customized Livid OhmRGB Slim template by eatyourwork

For today's guest post we're joined by eatyourwork who first introduced us to the possibilities of using OhmRGB Slim alongside of VDMX in a blog post a couple of years ago. Since then we've made a few basic templates for new video performers to get started with a simple VJ video mixer setup with the Ohm, but in this video tutorial Simas shows off the extent to which you can customize your layout and MIDI mapping when making your own video performance rig.

Read More

Making three templates for the Livid Base

When getting a new MIDI controller to use with VDMX, or other VJ / music making software, one of the most exciting aspects is finding out the best way to map the sliders and buttons to various controls that you want to use during performance, and along with that coming up with new ways that you can configure your software video generators and FX to get the most out of the layout of your instrument.

In this set of technique tutorials we'll be looking at three new example VDMX setups we've come up with for the Livid Base that take advantage of the controller in a few different ways including its multi-color LEDs and pressure sensitive pads.

Read More

Enabling hardware “Echo” mode for quick MIDI and OSC talkback with VDMX

Along with being able to receive real-time control values from MIDI and OSC based instruments, VDMX provides the ability to send the local state of interface items such as sliders and buttons back out to hardware controllers whose interfaces can update dynamically.

To make the setup of two way talkback with devices that support this kind of workflow faster to setup, each UI item in VDMX that is receiving from a MIDI or OSC source can be set to “echo” it's state back to the connected hardware controller.

Read More

Creating Gesture Based Controls for VDMX using the Gestrument Kinect MIDI controller app

Last week featured on CreateDigitalMusic we noticed the beta release of Gestrument Kinect, a  simple Mac app that can be used to convert the camera depth data from a Kinect to MIDI for controlling music and VJ live visuals. Since it sends of standard MIDI, it only took a few seconds to connect it to VDMX for a quick demonstration on how it's data can be converted into gestures used to trigger movie clips and adjust video FX parameters.

Read More

VDMX Question from the forums: How do you set an effect MIDI knob to be off when in the center position?

This question comes to us from the VIDVOX forums, and is most easily explained with a quick demonstration– the goal is to have a MIDI knob that is used to make the video become more pixellated as it is turned left or right, but is a regular pass-through when set to its center point.

In this tutorial video we'll show off how to use an LFO plugin in VDMX to create a lookup curve for mapping a MIDI knob to a different range of values to drive our pixellate FX being applied to a layer.​

Read More

The 8 Layer APC40 VJ Mixer Template for VDMX

​The Akai APC40 is one of the most known MIDI controllers designed to be used alongside Ableton Live for DJing and music production. It also happens to be a pretty good controller for working with video and in this tutorial we'll look at some tips for setting up an 8 layer setup with controls matched to the layout of the controller itself.

With this example template you can load in your own movie files and start mixing immediately, or further map the remaining knobs and buttons to your own selection of real-time video FX and other movie playback parameters.​

Read More

Two Channel Video Mixer template for Livid OhmRGB Slim

The OhmRGB is a hardware MIDI controller from Livid Instruments for DJs and VJs with a nice mix of faders, knobs and buttons for triggering clips or FX. It's an especially useful controller to use with VDMX because it has a versatile layout which can be adapted for a variety of different setups ranging from simple DJ style two channel video mixers to advanced multiple layer compositions.

Read More

Receiving MIDI SMPTE Time Code (MTC) in VDMX

​MIDI Time Code (MTC) is a specification for sending SMPTE values from a master playback application such as QLab or Apple Logic to keep the play time of other real-time music and visuals software in sync over MIDI.​ While MTC has a few drawbacks it can be very useful when setting up live performances where VDMX is being used alongside audio software that can send it.

In this tutorial we'll look at how to receive MTC ​in VDMX in two ways: First, the classic example of syncing the time position of a QuickTime movie to the incoming timecode. In the second case instead of a traditional movie, a simple Quartz Composer patch will receive the MTC and render a real-time animated read out of the values in standard SMPTE format.

Read More