Introduction to OCR & QR code capture in VDMX

VDMX 6.1 introduces a powerful new OCR (Optical Character Recognition) plugin that allows you to scan text and QR codes from live video input. These scanned results can be published as data-sources and used to trigger UI elements, update text layers, or automate actions in your VDMX setup.

Getting Started

To try it out, load the OCR Example template from the Templates menu. This preset is included with the latest version of VDMX and demonstrates how to use both OCR and QR scanning.

Before using the OCR plugin, make sure:

• You’re running VDMX version 6.1 or later

Quartz Composer is enabled under VDMX > Preferences > Rendering

What You Can Do

Live Text Scanning: Point your webcam at printed or handwritten text and see it appear in real time.

QR Code Scanning: Detect and display QR content directly into your project.

Data Routing: Use the UI Inspector to map scanned strings to text layers, pop-up menus, or other elements.

Clock Syncing: Trigger OCR or QR scans automatically on every beat using the Clock plugin.

This makes it easy to create interactive visuals using real-world inputs—great for installations, performances, or creative automation.


Trigger Media Clips in Real Time Using OCR and QR Codes in VDMX

By why stop there!? These outputs can be used to control UI elements like pop-up menus and, in turn, trigger clips in the Media Bin.

In this other tutorial, we’ll walk through how to set up a system that lets you hold up color-coded QR labels or text to control clip playback — ideal for powering interactive installations, printed cue cards, or playful VJ sets.

Getting Started

1. Open the “OCR Example” template from the Templates menu.

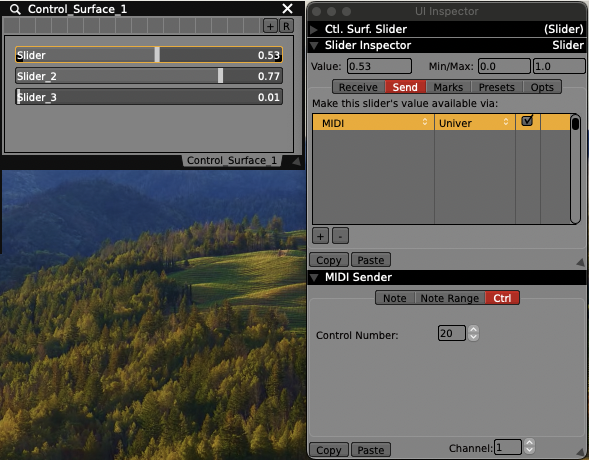
2. In the Workspace Inspector (Cmd+1), add a Control Surface plugin.

3. Create a Pop-Up Button and label its items (e.g., Red, Green, Blue).

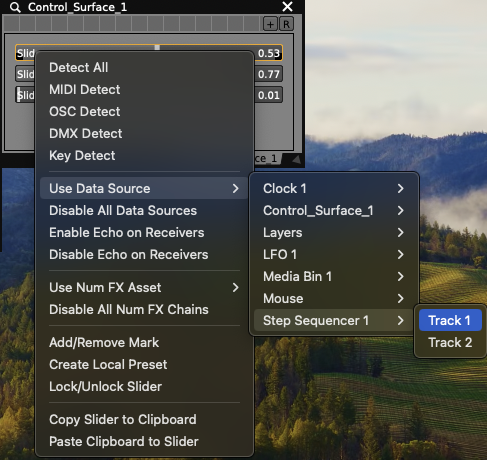
4. In the UI Inspector (Cmd+2), set the pop-up to be controlled by the OCR text string:

• Navigation > Select by string

• Data-Source > OCR Text

Link OCR to Media Playback

Once your pop-up button is receiving the OCR string:

1. Go to the Media Bin Controls tab.

2. Set Trigger by Index and choose the pop-up button as the source.

3. When the pop-up changes value (based on OCR input), the corresponding clip will be triggered.

Try It Live

Switch the OCR video source to a FaceTime or external camera, then hold up QR codes or printed text. As the plugin reads values like “red,” “green,” or “blue,” it updates the pop-up and triggers the matching clip.

You can also sync scanning with the Clock plugin to automatically scan at regular intervals, creating hands-free interaction loops.

Tips & Tricks

Case matters – OCR text strings must match your pop-up labels exactly.

• You can also scan handwritten words, printed stickers, or even project QR codes from your VDMX interface using:

QR Code Generator Source (creates QR codes as layer sources)

QR Code Overlay FX (renders QR code overlays on top of any layer)


Try It Yourself

The OCR Example template is available in the latest build of VDMX. If you’re experimenting with it in your work, tag us—we’d love to see how you’re using this feature.

If you’re building an interactive installation or performance using OCR, we’d love to see it. Tag us or share your project with [@VIDVOX].

Using VDMX as a Step Sequencer and LFO for Euroracks

One of the most fun aspect of using Eurorack setups is the ability to quickly reroute control data and sound between different modules. Conversely one of the most limiting parts of using Eurorack setups is the ability to quickly swap out different modules from your rack to get different kinds of control data and sound coming and going from your system. In this tutorial we will look at how the Step Sequencer and LFO plugins in VDMX can be used alongside Eurorack setups to provide a versatile approach to generating CV values.

As Eurorack modules are also often a significant investment of money, it can also sometimes be useful to use software tools like VDMX to simulate their abilities to determine if they are a good fit for your needs before purchasing.

Overivew

This tutorial is broken into three main parts:

  1. Setting up our Eurorack to convert MIDI to CV.

  2. Setting up VDMX to send MIDI to the Eurorack.

  3. Configuring step sequencer and LFOs in VDMX to control parameters on our Eurorack.


Setting Up A Eurorack To Receive MIDI to CV

Univer Iter MIDI to CV and Tiptop Audio Buchla 258t Eurorack modules.

For this initial demonstration of doing MIDI to CV we are using the Noise Engineering Univer Inter along with a Buchla & Tiptop Audio 258t Dual Oscillator module to generate tones.

The Univer Iter has 8 CV out ports along with a USB port which can be directly connected to a computer for receiving incoming MIDI. Within applications like AudioMIDI Setup and VDMX it appears as a standard MIDI output device option. It also can be configured to use a custom MIDI mapping as needed and can be daisy chained with a second module for another 8x outputs.

A variety of different modules are available for taking MIDI data in one form or another and converting it to CV. As always with Eurorack setups it is prudent to spend some time looking at all of the module options and picking the best for your specific needs.


Setting Up VDMX To Send MIDI Output

Most user interface controls in VDMX such as sliders and buttons can be configured to directly send their current value as MIDI output using the “Send” tab of the “UI Inspector” window. When configuring VDMX to drive external devices such as a Eurorack it is often useful to add a “Control Surface” plugin with customized set of UI elements that represent each of our individual CV outputs.

Steps:

  1. Use the “Plugins” tab of the “Workspace Inspector” to add a “Control Surface“ plugin to the project.

  2. Use the sub-inspector to add one or more UI elements (sliders, buttons, pop-up menus, etc). to the control surface interface.

  3. Click on each UI element in the Control Surface main window to inspect it. Use the “Send“ tab of the “UI Inspector” to configure the MIDI mapping and output device.


Configuring Step Sequencer and LFOs in VDMX To Control Eurorack Parameters

Now that our Eurorack is receiving MIDI from VDMX and converting it to CV we can begin to set up our Step Sequencer and LFO plugins to drive individual parameters of our synthesizer.

A VDMX setup with a two track step sequencer, an LFO, a clock plugin, and a control surface configured to send MIDI output.

Steps:

Right-click on sliders and buttons to assign data sources.

  1. Use the “Plugins” tab of the “Workspace Inspector” to add a “Step Sequencer“ plugin and an “LFO” plugin to the project.

  2. Use the sub-inspector to customize Step Sequencer / LFO configurations as needed.

  3. Right click on output UI elements in the Control Surface or use the UI Inspector to route generated control data to our MIDI outputs.

  4. Patch the MIDI module CV output to synthesizer input parameters.

  5. Use the “Clock” plugin to adjust the overall BPM.

Once we’ve created our parameter routings on the Eurorack we can also optionally further customize our Control Surface with appropriate labels and display ranges, or continue to leave them as generic 0-1 values that are commonly re-patched on the fly.


Using OSCQuery In The Control Surface Plugin

The Control Surface is one of the most widely versatile plugins in VDMX, making it possible to create sets of custom interface elements that can be used to control nearly any aspect of your workspace or send MIDI / OSC / DMX to other systems. The Control Surface plugin also has the ability to publish its list of parameters over a local area network using the OSCQuery protocol so that other software can remotely browse and control almost any aspect of your VDMX project.

In this video tutorial we'll be looking at the basics of using OSCQuery protocol from within the Control Surface, and three ways that those parameters can be accessed from software running on other devices: using our free OSCQuery Browser utility, another copy of VDMX and a web browser running on an iPhone.

Read More

Loops – Performance, Production, and Progression

The heart of almost every VJ / Visualist performance is the loop. There are lots of techniques and training for the production of loops, but there are some common approaches and methodology of creating a “pack” that are explored in this guest tutorial by Colin Evoy Sebestyen. To demonstrate these ideas Colin breaks down a project he created with musician Nonagon for a performance series at The Tech Museum of Innovation in San Jose.

Read More

Guest Tutorial: 10 Workflow Tips from DocOptic

This guest tutorial from the DocOptic team goes over some of their favorite tips to improve our workflow while using VDMX including keyboard shortcuts, BPM automation, presets, and more. Also covered are a few techniques using features of VDMX such as the Alpha Mask effect and using application windows as media sources.

Read More

Sending DMX From a VDMX Color Picker

Like most interface items in VDMX, the Color Pickers can send their current state the DMX protocols for syncing with lighting consoles and fixtures making it possible for a VJ to control both the visuals and lights at a live event. In this video tutorial we'll set up a DMX controllable lighting fixture and set up a Control Surface plugin with interface items for adjusting each of the available parameters.

Read More

Creating Gesture Based Controls for VDMX using the Gestrument Kinect MIDI controller app

Last week featured on CreateDigitalMusic we noticed the beta release of Gestrument Kinect, a  simple Mac app that can be used to convert the camera depth data from a Kinect to MIDI for controlling music and VJ live visuals. Since it sends of standard MIDI, it only took a few seconds to connect it to VDMX for a quick demonstration on how it's data can be converted into gestures used to trigger movie clips and adjust video FX parameters.

Read More

VJ Spain Guest Tutorial: El plugin Control Surface

his special Spanish language guest tutorial on using the 'Control Surface' plugin comes from Marcos Prack of VJ Spain who joins us with a preview of his upcoming 4 day workshop on using VDMX and Quartz Composer in Madrid this April.

More information about the course can be found on the VJ Spain website: http://vjspain.com/blog/2013/03/20/workshop-quartz-composer-vdmx-integracion-y-flujo-de-trabajo/

Read More