One of the most fun aspect of using Eurorack setups is the ability to quickly reroute control data and sound between different modules. Conversely one of the most limiting parts of using Eurorack setups is the ability to quickly swap out different modules from your rack to get different kinds of control data and sound coming and going from your system. In this tutorial we will look at how the Step Sequencer and LFO plugins in VDMX can be used alongside Eurorack setups to provide a versatile approach to generating CV values.
As Eurorack modules are also often a significant investment of money, it can also sometimes be useful to use software tools like VDMX to simulate their abilities to determine if they are a good fit for your needs before purchasing.
Overivew
This tutorial is broken into three main parts:
Setting up our Eurorack to convert MIDI to CV.
Setting up VDMX to send MIDI to the Eurorack.
Configuring step sequencer and LFOs in VDMX to control parameters on our Eurorack.
Setting Up A Eurorack To Receive MIDI to CV

Univer Iter MIDI to CV and Tiptop Audio Buchla 258t Eurorack modules.
For this initial demonstration of doing MIDI to CV we are using the Noise Engineering Univer Inter along with a Buchla & Tiptop Audio 258t Dual Oscillator module to generate tones.
The Univer Iter has 8 CV out ports along with a USB port which can be directly connected to a computer for receiving incoming MIDI. Within applications like AudioMIDI Setup and VDMX it appears as a standard MIDI output device option. It also can be configured to use a custom MIDI mapping as needed and can be daisy chained with a second module for another 8x outputs.
A variety of different modules are available for taking MIDI data in one form or another and converting it to CV. As always with Eurorack setups it is prudent to spend some time looking at all of the module options and picking the best for your specific needs.
Setting Up VDMX To Send MIDI Output
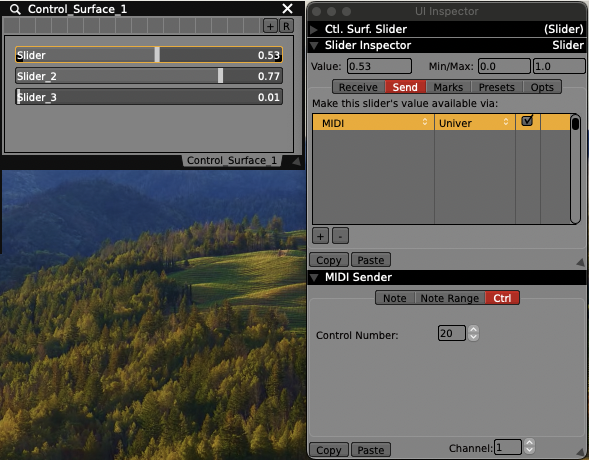
Most user interface controls in VDMX such as sliders and buttons can be configured to directly send their current value as MIDI output using the “Send” tab of the “UI Inspector” window. When configuring VDMX to drive external devices such as a Eurorack it is often useful to add a “Control Surface” plugin with customized set of UI elements that represent each of our individual CV outputs.
Steps:
Use the “Plugins” tab of the “Workspace Inspector” to add a “Control Surface“ plugin to the project.
Use the sub-inspector to add one or more UI elements (sliders, buttons, pop-up menus, etc). to the control surface interface.
Click on each UI element in the Control Surface main window to inspect it. Use the “Send“ tab of the “UI Inspector” to configure the MIDI mapping and output device.
Configuring Step Sequencer and LFOs in VDMX To Control Eurorack Parameters
Now that our Eurorack is receiving MIDI from VDMX and converting it to CV we can begin to set up our Step Sequencer and LFO plugins to drive individual parameters of our synthesizer.

A VDMX setup with a two track step sequencer, an LFO, a clock plugin, and a control surface configured to send MIDI output.
Steps:
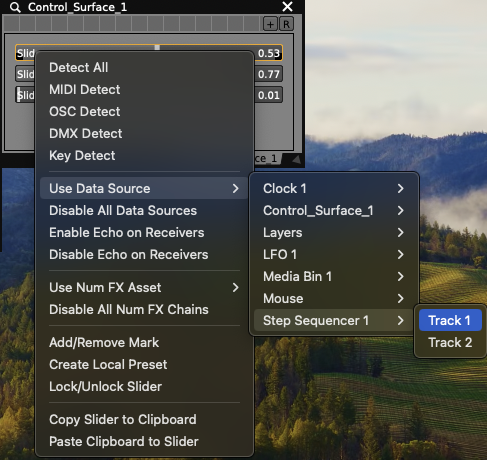
Right-click on sliders and buttons to assign data sources.
Use the “Plugins” tab of the “Workspace Inspector” to add a “Step Sequencer“ plugin and an “LFO” plugin to the project.
Use the sub-inspector to customize Step Sequencer / LFO configurations as needed.
Right click on output UI elements in the Control Surface or use the UI Inspector to route generated control data to our MIDI outputs.
Patch the MIDI module CV output to synthesizer input parameters.
Use the “Clock” plugin to adjust the overall BPM.
Once we’ve created our parameter routings on the Eurorack we can also optionally further customize our Control Surface with appropriate labels and display ranges, or continue to leave them as generic 0-1 values that are commonly re-patched on the fly.